News:

Forum may be experiencing issues.

Main Menu
Menu

Show posts

This section allows you to view all posts made by this member. Note that you can only see posts made in areas you currently have access to.

Show posts Menu

Messages - H.E.L.Shane

#1
Thank you very much!! 8)

That was exactly what i needed to know.

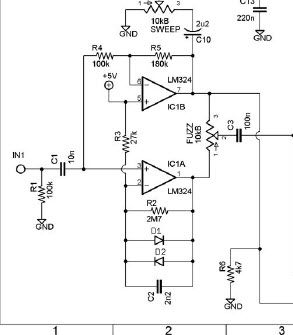
In all my searching..  I did not find mention of the 2:1 ratio..  But it makes sense why you would use two diodes of the same type on one and one on the other..

That was the ammo i needed to really be a danger to myself and others!!!! ;D

#2
OK..  So i've been geekin my brains out and learning (and Relearning) a LOT about circuits.

Last night, I successfully fixed an ADA MP-1 that somebody screwed up trying to mod by reading the schamatic and figuring out where he/she replaced the wrong resistors and caps!!  (uuugh.. that thing sounds good now!!)

ANYWAY... right now, I'm building a honey dripper and would like to do the Asymmetrical clipping mod as jimmi photon suggests..

BUT... being that i liek a bunch of switches and other garbage on my pedals.. I was thinking of adding a switch to select from the stock symmetrical 1n914s to the modified 1n34a and 1n914.. 

HOWEVER..   i've been doing the research on the Asymmetrical Vs Symmetrical thing....

Sooooo   in the below piece of the schematic for the honeydripper... I'm assuming that d1 and d2 are the clipping diodes..  correct??

Most of the blubs ive been reading through use 1 diode on one side and two diodes on the other side for the asymmetric clipping,, 

BUT... Am i correct that by having diodes of different types on the positive and negative clipping sides that this is also asymmetrical clipping?? (as jimmy refers to using a 1n34a and 1n914.. 

so, to get assymetrical clipping you could use a 1n34a as d1 and a diffused red LED as D2 or, you could use 1 1n34a as d1 and two 1n34a in series as d2, OR use a 1n34a as d1 and a BAT41 as d2?

#3
Thanks guys...   I tried to get a recording of it.. and i did.. but.. I noticed that at more than a crack of volume from my Mesa 20/20, my vertical 2x12 is making some kind of weird, plastiky buzzing fizzing sound...  somethings loose in there.. not the grille or emblem.. this requires surgery!!!   

It was really annoying with the clean sounds and still present with the pedal on, so i don;t want to put it on youtube and have anybody think its the pedal..

BUT.. with the 20/20 crankin pretty good letting the v-30's unload.... DAMN this pedal ROCKS!!!! 
#4
Quote from: rullywowr on May 09, 2013, 03:28:43 PM
Looks great!  I like the use of the ol' cloth covered wire - nothin' wrong with a little extra "mojo"

I love the pushback wire myself..  no stripping.. looks cool.. right size for boards...

I also have a thing for Vintage Gibbys, therefore, its what i expect to see when i open up a guitar..  thus, i build my guitars with it...  thus, is handy in the shop for pedals too!
#5
I've built the "Chunk Chunk" and the "Pork Barrel", both of which I am using, but this is the first pedal I added graphics to and completely "finished".

Its a slow loris RAT madbean board and I built it exactly as spec'd, and i'm VERY happy with it, so I'm not going to mod it any further so I added graphics and finished the box!!!

Since its a RAT... i decided to use the graphics from the old movie "Ben" as I remembered that the poster was pretty creepy!   Like a few other guys, I also decided to show off the LED's.  In Ben's case, I drilled a 1/16th hole through his eyes, and then used a bullet grinder on a dremel to create a socket for the LEDs to sit in behind.  It turned out really cool.  The LEDS sit flush with the graphic and when they are off, it looks like they are just red eyes.

I also use Pushback wiring on my builds as its what i use to wire guitars in the shop, and, i like it!!

I'm very happy with it!  like it better than the original RAT I had back in the 80's actually!!  (but.. my judgment might have been impaired back then!!)

I will say however, that next time, i will use the paper supplied with the transfers rather than a t-shirt when heat setting the graphic...   the T-shirt left a cloth like pattern on the graphic that took FOREVER to lacquer over!

Anyway, here it is!!


#6
mad props for squeezing the honey dripper in that box!!!!
#7
Quote from: madbean on May 06, 2013, 10:22:54 PM
If you want to just shift the Rate further down the register, increase R35. Try 1M5 or 1M8.

I thinnk thats what i'm trying to do,

I'd like the maximum rate to be approximately half of what it is now..  and have more control over that half  (ie expand the control so that 0 is zero, but 10 is only half of what it is stock)

when i get my next smallbear order in, i'm going to socket those componenets and try different values.

I love this freakin pedal over the other pedals on my board, btw, I just have no use for the top 50% of the rate knob!!
#8
UUUGGHHH..   after geeking though a couple acticles on hos choruses work.... now.. i'm starting to think its C20....  LOL..

Im such a non functional nerd anymore...
#9
OK.. so i've searched through the archives and found a couple references to speeding up the rate by changing C-19 or C-20 and I'm a bit confused as to which, exactly controls the rate as there is also reference to a Tonepad project which, i can't find a schematic for..


Anyway.. I want to LOWER my overall rate as i never have the pedal on more than about 2 with the current setup.  

Sooo... In the diagram below, (which is to the board i built off of), which of the capacitors is the "charge Sink" that controls the rate??

trying to understand the circuits rather than just build them.

My hunch is that its C19 because that is between pin 2 of the opamp and the rate pot and drains to ground

#10
here a good example of the "phaser/ flanger" effect.. you can hear it at the end under distoirtion.

http://www.youtube.com/watch?v=uzr1bKff9VE
#11
oops
#12
hmmmm   good info...

I have a second board...   will try this..

like i said.. i LOVE it the way it is...

BUT.. i want two.. .one for my cleans and one for my distorted...    as id rather not much with settings between songs..  right now, can't just leave it on as the flanger/phaser effect is too much for distorted sound and i have to lower the depth to about 2 to get a sweet solor under distortion wihtout the flange / phase thing.


I'll post a clip of whats going on tonight so the effect is readily apparent..

in any case.. I have to get a couple more boards because both of my latest guitar build customers want one now.. just the way it is!!
#13
Ok....  Got my pork barrel done.....

I freaking LOVE it!!!

Question...

Clean...  Its an awesome chorus.   

Distorted....  Love it too....  BUT....  Its not what i expected..

It has a kinda....  Flanger type sound when you run a distortion in front of it....

Now...   I did the LFO LED mod and its working....  Does that have something to do with it??

Or is it that im running it post distortion????

Dont get me wrong...  I like it....  Its just different than the chorus om used too out oc my tce gmajor after my mp1
#14
General Questions / Re: Tiny 1.0 uF's
April 18, 2013, 02:39:26 PM
I used them in c3 c9 and C14 in my Chunk Chunk build...

Switched them out for Kemet MMK's and I did notice a reduction in noise.


#15
General Questions / Re: Chunk Chunk Gain Questions
April 18, 2013, 02:31:16 PM
uuugh... thanks... i was putting "strip board" into the item search and nothing.... remove the space and put in "stripboard" and they come up...   ::)