
Quote from: vagos21 on November 23, 2019, 02:27:29 PMSee schematics for the E003. I use a solid state relay to mute just the output for 10 ms. However, another problem is a couple of leds changing, which might feed back into the power or Gnd rail. This is nasty, esp. With delays in the spillover loops. Read r. G keen for some approaches on how to fade in leds slowly to prevent popping.
Hello everyone, it's my first time here and boy oh boy what a wonderful forum this is! I might need to start a new thread for my own programmable looper build which is coming very soon... But I have a couple of questions that the experienced looper builders might be able to help with
I have separated stomp unit and relay unit (to add new stuff whenever needed and be more versatile away from the pedalboard
So the stomp unit has a touch screen to be programmed easily. The relay unit features 10 loops, midi out, 4 amp switches, switchable buffers for input and output (adjustable gain too) and I am currently working on the trails mixer for loops 9 & 10. But FOR THE LOVE OF GOD, how do I get rid of the true bypass relay pops? I've been reading about true bypass for days, and it seems to come down to either accepting the pop, or muting the output for 10-20ms until the switching is complete.... So what are your thoughts? Which circuit do you use for that job, and whych parts do you mute, output only?
Thanks for your patience...
Vangelis
- Welcome to madbeanpedals::forum.
This section allows you to view all posts made by this member. Note that you can only see posts made in areas you currently have access to.
#91
Build Reports / Re: Eoo3: Programmable Looper/Switcher/Midi Controller
November 23, 2019, 08:00:37 PM
#92
Build Reports / Re: Economy memory man, a simple analog delay
November 20, 2019, 04:07:37 PM
I think there is still room for a battery :-)
#93
Build Reports / Re: Eoo3 progress
November 13, 2019, 05:27:07 AM
Cool. I guess that hookup wire is totally fine, unless you use multiple high gain pedals. Let me know, please. Hope, that the spillover works for you and does not create switching noises... So excited to see yours come alive!
#94
Build Reports / Re: Eoo3 progress
November 04, 2019, 03:36:42 PM
As a motivation: Re-labelled mine and use it mainly as a controller for my HX Stomp and Amp Channel Switching. Looks like this these days: 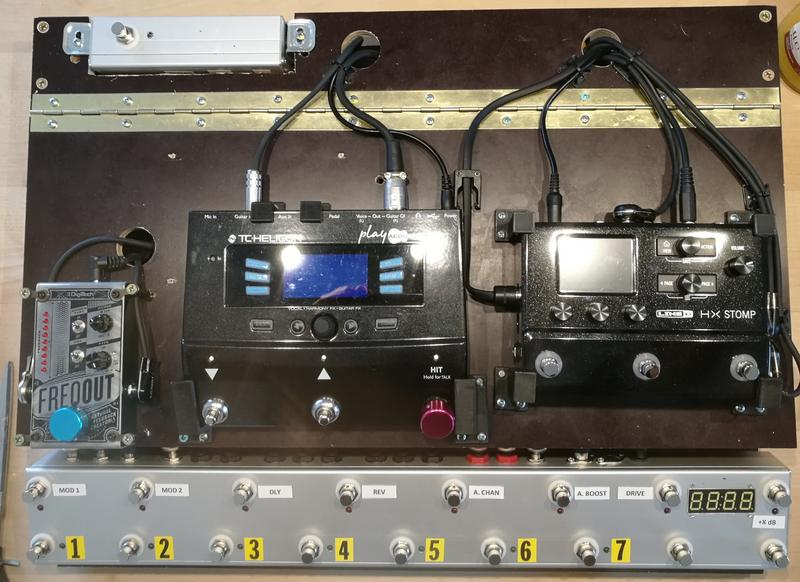
#95
Build Reports / Re: Pedalboard pics megathread
November 02, 2019, 08:01:58 PMQuote from: Marshall Arts on May 12, 2019, 04:44:19 PM


Update: With the release of the HX Stomp firmware version 2.8 earlier this year, Line 6 added the Zendrive (Dhyana Drive), the Prince of Tone (Heir Apparent) and the King of Tone (Tone Sovereign). I was able to compare my "Queen of Bone" with the Tone Sovereign, and while it is different, it's hard to tell which one is better. Hard stuff for an analog believer like me ;-)
Ultimately, I removed the Queen of Bone and replaced it in my patches with its digital brother. The HX is controlled with my Eoo3 Midi controller, that also switches my amp's channels. I also created some really convincing new patches that use the zendrive into the litigator (Dumble Clone) and go straight to the Engl Ironball's return jack.
With the space no longer needed, I could move the vocal processor to the top deck.
#96
Build Reports / Re: Tweed Champ redux
October 30, 2019, 04:39:10 PM
I love everything about it.... except for the purple chickenhead ;-)
The dog is awesome as well!!!! BTW: Any Progress on your Eoo3 build (http://www.madbeanpedals.com/forum/index.php?topic=29713.msg290629#msg290629)??
The dog is awesome as well!!!! BTW: Any Progress on your Eoo3 build (http://www.madbeanpedals.com/forum/index.php?topic=29713.msg290629#msg290629)??
#97
Build Reports / Re: Magnum Opus - 3 channel Boneyard Ultra Mega Plus
October 30, 2019, 02:02:47 PM
Wow... that's a lot of... wires, LEDs, switches, diodes, pots, footswitches, vero boards. I cannot imagine operating this monster live, but I guess you will settle for a specific setting sooner or later ;-). Impressive work, I admire your patience.
#98
Build Reports / Re: TAPRECISE - Calibrated Tap Tempo with Presets, Subdivision and Modulation
October 30, 2019, 11:39:50 AMQuote from: lars-musik on October 30, 2019, 09:36:11 AMGlad you like it! Let us know about your build progress!
Hey! I wast just pointed to this fantastic project whilst looking for a Taptation-Chip. Now I stop wondering, why the Taptation seems to vanish from most stores.
This here is brillant (I really hope I'll get it to work, unfortunately I'll have to wait some time to get the parts beacuse the digipots are not readliy available in my usual stores).
Thanks a LOT for sharing this freely and keeping the DIY spirit alive.
#100
Build Reports / Auto 808
September 29, 2019, 08:00:47 PM
Can anybody explain to me, why the two of the most iconic devices in music electronic have an "808" in their product name? Anyway, the "Auto 808" is referring to the TR-808 Rythm Composer, not the TS-808 Tube Screamer ;-).
Background story: I sometimes play a foot stomp with my acoustic guitar (basically a number plate with a bass pickup below it) to add some "four on the floor" beats. However, I was always looking for something more automatic, where I tap in the tempo and the thing keeps going... Than I saw the documentary "808 - the heart of the beat that changed music" (https://en.wikipedia.org/wiki/808_(film)) during vacation and thought, that an 808 bass drum and some arduino control might do the trick. I designed taprecise (a tap tempo control for PT 2399 based delays, http://www.madbeanpedals.com/forum/index.php?topic=22653.0) before, so I knew that this would not be too complicated. Initially, I wanted to build the analog bass drum circuit from the 808, but than I found out, that you can use the PWM output to play samples. And somebody had already designed a polyphonic (!) arduino sample player with 808 samples (https://hackaday.com/2016/02/23/a-slew-of-open-source-synthesizers/). The sample quality is not brilliant, but it's absolutely ok for the purpose.
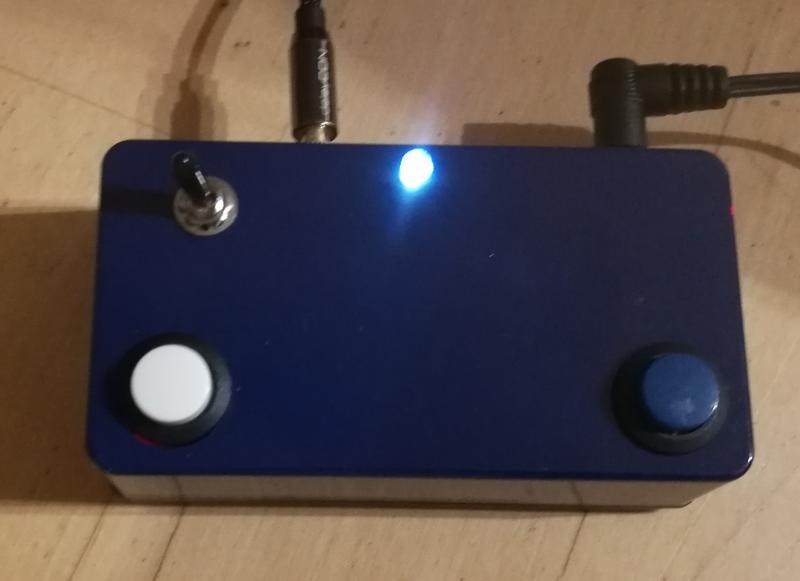
The Auto 808 has a white tap tempo button and a blue "mute" button. Tempo can be tapped while the thing is muted, the LED will indicate the beat. Once the tempo is set, I can unmute the Auto 808 and it will start straight on the press of the blue button.
When the switch is set to the left, the device is in manual mode - the white button will trigger a bass drum sound each time it's pressed (so, basically it will work like a foot stomp). There is no latency (the samples are played via interrupt).
Output is a mono 3.5 mm jack, as it will be connected to the AUX in on my "TC Helicon Play Acoustic Live" (which is also 3.5 mm, so I don't need an adapter cable).
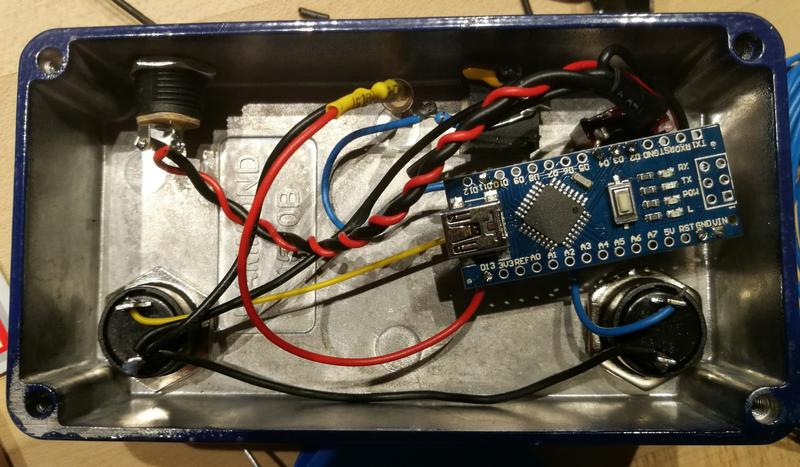
I liked the breadboard version from this morning so much, I decided to build it straight away and not make a PCB for it. With only a few offboard components, it may not look nice from the inside, but it's a great practice tool and a powerful bass drum companion.
Background story: I sometimes play a foot stomp with my acoustic guitar (basically a number plate with a bass pickup below it) to add some "four on the floor" beats. However, I was always looking for something more automatic, where I tap in the tempo and the thing keeps going... Than I saw the documentary "808 - the heart of the beat that changed music" (https://en.wikipedia.org/wiki/808_(film)) during vacation and thought, that an 808 bass drum and some arduino control might do the trick. I designed taprecise (a tap tempo control for PT 2399 based delays, http://www.madbeanpedals.com/forum/index.php?topic=22653.0) before, so I knew that this would not be too complicated. Initially, I wanted to build the analog bass drum circuit from the 808, but than I found out, that you can use the PWM output to play samples. And somebody had already designed a polyphonic (!) arduino sample player with 808 samples (https://hackaday.com/2016/02/23/a-slew-of-open-source-synthesizers/). The sample quality is not brilliant, but it's absolutely ok for the purpose.
The Auto 808 has a white tap tempo button and a blue "mute" button. Tempo can be tapped while the thing is muted, the LED will indicate the beat. Once the tempo is set, I can unmute the Auto 808 and it will start straight on the press of the blue button.
When the switch is set to the left, the device is in manual mode - the white button will trigger a bass drum sound each time it's pressed (so, basically it will work like a foot stomp). There is no latency (the samples are played via interrupt).
Output is a mono 3.5 mm jack, as it will be connected to the AUX in on my "TC Helicon Play Acoustic Live" (which is also 3.5 mm, so I don't need an adapter cable).
I liked the breadboard version from this morning so much, I decided to build it straight away and not make a PCB for it. With only a few offboard components, it may not look nice from the inside, but it's a great practice tool and a powerful bass drum companion.
#101
Build Reports / Convert a cheap Bluetooth Numeric Keypad into a Pageturn Stompbox
August 29, 2019, 07:59:34 AM
The topic says it all. This is (obviously) not to show off any special skills, I just wanted to quickly build something really cheap and did not want to pay 60 bucks or more on an Airturn or Blueturn. Here is how I did it, in case somebody is looking for something similar, this will save you a lot of time for reverse engineering the keypad logic...
Start with this keypad (only the packaging is left...):
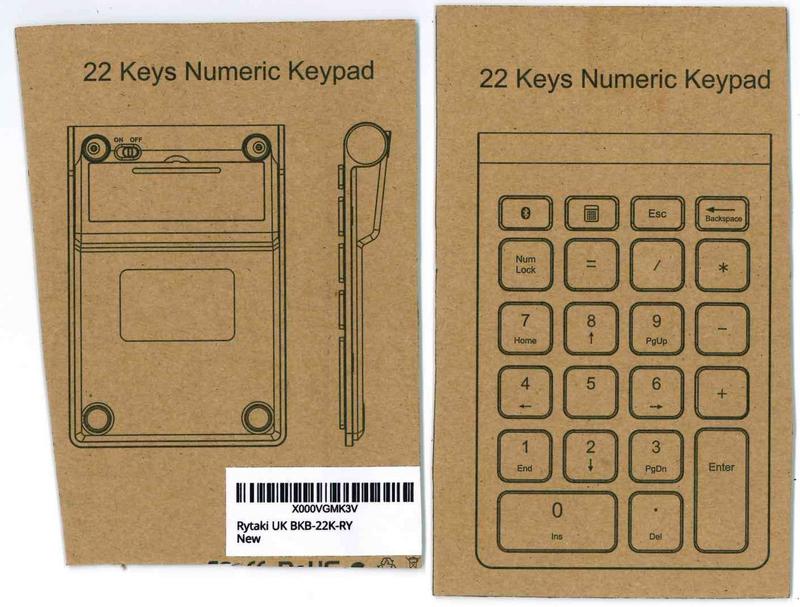
Remove the keypad from the main PCB (you can slide it out or simply cut the transparent "cable")

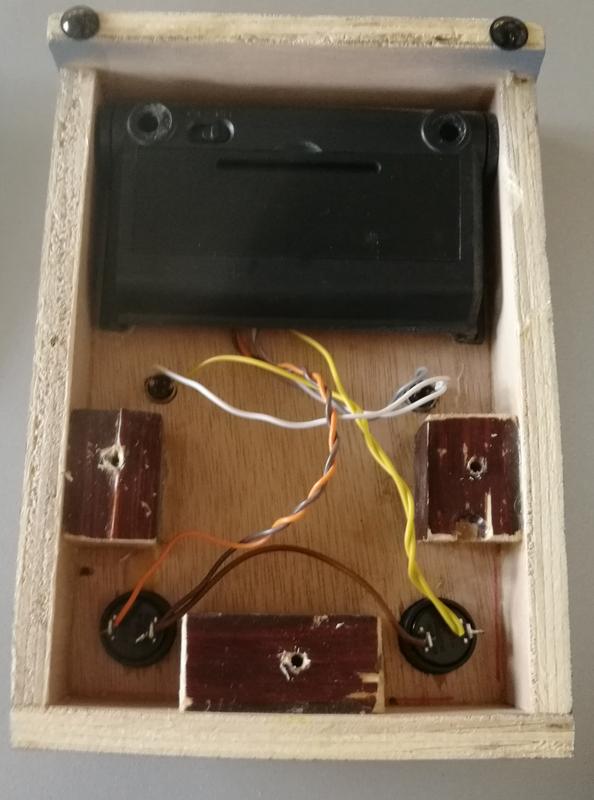
Cut off the plastic enclosure below the battery compartment (already glued in the enclosure and wired in the picture)
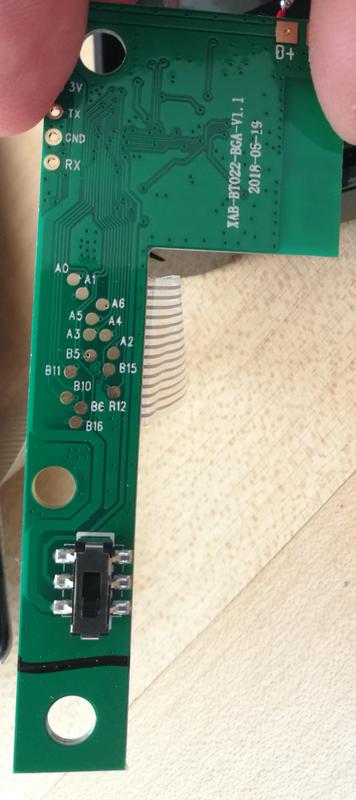
Solder wires to the PCB to the connections A3, A6, B5, B10, B15. I chose the following colours:
A3=White
A6=Brown
B5=Yellow
B10=Grey
B15=Orange
For the offboard wiring, the following connections send the corresponding keypress:
A6-B15="6/go right" (brown/orange in my build)
A6-B5="4/go left" (Brown/yellow in my build)
A3-B10="Bluetooth connect" (white/grey in my build)
A3-B5="Toogle Num Lock" (white/yellow in my build)
The last two are only needed to bind the pedal to a new tablet/notebook/mobile phone or to change to cursor mode, should the device ever come up with num-lock activated (it actually has not so far...)
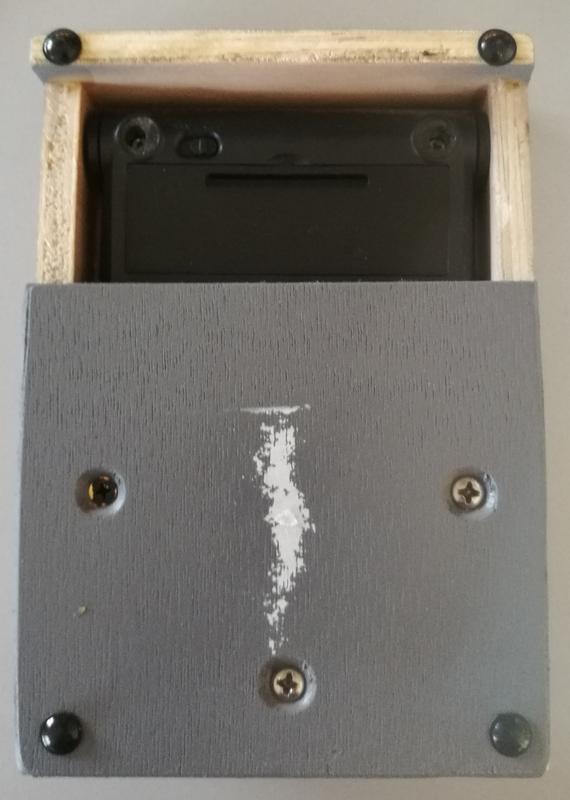
The back lid allows for access to the batteries and the on/off switch:
The front side could not be more "Quick and Dirty DIY":

Start with this keypad (only the packaging is left...):
Remove the keypad from the main PCB (you can slide it out or simply cut the transparent "cable")
Cut off the plastic enclosure below the battery compartment (already glued in the enclosure and wired in the picture)
Solder wires to the PCB to the connections A3, A6, B5, B10, B15. I chose the following colours:
A3=White
A6=Brown
B5=Yellow
B10=Grey
B15=Orange
For the offboard wiring, the following connections send the corresponding keypress:
A6-B15="6/go right" (brown/orange in my build)
A6-B5="4/go left" (Brown/yellow in my build)
A3-B10="Bluetooth connect" (white/grey in my build)
A3-B5="Toogle Num Lock" (white/yellow in my build)
The last two are only needed to bind the pedal to a new tablet/notebook/mobile phone or to change to cursor mode, should the device ever come up with num-lock activated (it actually has not so far...)
The back lid allows for access to the batteries and the on/off switch:
The front side could not be more "Quick and Dirty DIY":
#102
Build Reports / Re: Eoo3 progress
August 19, 2019, 07:39:01 AM
Wow, great work there... I know that the space for all these wires is tight, but did not find another solution for that.... I could have used +5v and Gnd 'rails' and than connect both from switch to switch, but that does not look nice either...
If it boots up, midi will work :-)
I like your Eoo3, but your dog is the REAL Beauty in this thread! Wow.
If it boots up, midi will work :-)
I like your Eoo3, but your dog is the REAL Beauty in this thread! Wow.
#103
Build Reports / Re: Eoo3: Programmable Looper/Switcher/Midi Controller
August 07, 2019, 08:23:09 AM
Yes. I send you a PM.
#105
Open Discussion / Re: What do you love about pedal building?
July 10, 2019, 04:15:39 PM
Designing something new, trying it out on a breadboard, drawing a schematic, layout of a PCB, ordering it, getting it, building it, sharing it. It's great to build something "real", if your main job is creating intangible stuff.
And I really like this forum, everyone is really friendly, helpful and funny. It's the only one I contribute to.
And I really like this forum, everyone is really friendly, helpful and funny. It's the only one I contribute to.