madbeanpedals presents: "DrunkenDragon"
- a Lovepedal 'Eternity' [k]lone.
OMGZ. You builted an Eternitys! Yep. I builted an Eternitys. I was curious as to exactly what secrets were hidden behind all that hype. Fortunately, I didn't have to wonder long since there are several schematics out there (you know where...don't be cheeky). Deciding which version to build was easy: I went with the 'Burst' model, because it is the most expensive, and therefore the best. Also, I had most of the parts.
It cost me about $35.


The next most important thing was deciding how it should look.
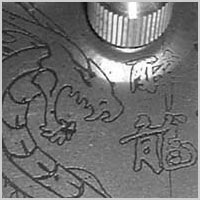
One word came to mind: badass. I decided to go with etching the enclosure since I love the etched look. I knew it would have to have a dragon. Not sure why, but it seemed appropriate. And,I guess there was also version from Lovepdal that had a dragon, so it was clearly an "homage". I threw in some other crap, too.
Actually, I have only etched a couple of boxes before.
The first attempt a couple of years ago was a complete disaster. I did everything wrong, including forgetting to reverse the image before priniting the PnP. That was before I even had a laser printer, so I had to use one at work.
Anyway, the second attempt I did for a friend. It turned out great! Unfortunately, I didn't use any precautionary measures and ended up spilling FeCl on my patio. I almost had to get a divorce over that one. The wife made it quite clear I was never use chemicals again.
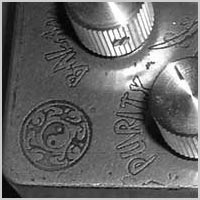
I figured since that was a year ago, she probably had forgotten about it. Turns out she decided to trust me this time. So, I spent a lot of time sanding and sanding and then I think I sanded some more. I spent as much in sandpaper as I did on the enclosure. Good thing, too, because it came out perfect!
Okay, well not quite perfect...
That's okay though, because even imperfect etches can still look cool. I had to do some touchup work after the PnP transfer, and there were still some fuzzy areas. So, I decided I wouldn't even bother masking the sides and just dumped the thing in etchent.
I'm glad I did that because it gave the edges a real rough and worn-in look. And sanding it some more smoothed it all out. After that, some black spray paint and fine sanding. Then I was ready for the next step!
How not to do things...
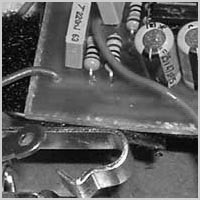
Since there weren't any pre-existing PCB's out there that I knew of, I figured I might as well go ahead and make one. I've done a few before, and it's a fun challenge. So, I fired up DIY Layout and went for it. After a couple of hours I had a nice tight layout. I quickly turned that around into a couple of finished PCB's and started hooking it all up.
Turns out, my PCB design was wrong. GODDAMMIT! I had outputs coming from inverting inputs and reversed tone stacks and I think even "stab" knob by the time I was done. Actually, I could have fixed it with a few jumpers and whatnot, but I don't like doing things so ad-hoc. Back to the drawing board for another PCB design!
Moving right along.
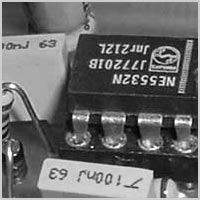
The second PCB attempt was a success. I was extra careful this time, and checked things over before jumping to the etching stage. Lesson learned!
Anyway, I sunk the parts pretty quick and hooked it up to the breadboard to test it out before committing it to my preciouse dragon box.
Of course, it didn't work at first. But, I tracked the bugs down quickly (bad pot, solder joint). I had to do a few part subs here and there. The original Eternity has a low pass filter between stages of the opamp with a 150nf cap to ground. Not having this value, I subbed in a 100nf figuring it was probably enough. I also had to go with a 100kA volume pot since my one 500kA pot was toast. Neither of those is too great a change...but who knows. Sean doesn't even put LED's or power jacks in his Eternitys these days due to some sound alterations or other marketing BS (actually, I think he just likes to save a couple of bucks on parts).
Ladies and (mostly) gentleman...I give you...mojo.
Well, not quite. According to Sean, the secret ingredient in the Eternity is the IC, which is supposedly an LM1458 or something else I never heard of. Not having any of those on hand, I swapped a few different opamps out through the socket. Here's a summary:
TL072 - Smooth, predictable and boring.
LM833 - Much better, more bite. But, thins out and whines a bit at full gain.
OPA2604 - Burr-Brown. Well, mine was fried, so I don't know how it sounds.
LF353 - Good. But, just a bit too much bite for my tastes.
NE5532 - The one I went with. In the end, I rather liked how this one sounded. Gainy enough, with some grit and bite, but not overbearing.